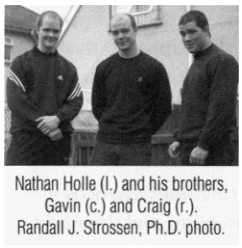
[ The Holle Method for Training and Succeeding with the Captains of Crush Grippers by Nathan Holle ]
None of us [Nathan Holle and his brothers Craig and Gavin] has ever done a warm-up. We don't think that there is any harm in a warm-up; it is just that we always just tore straight into our training. As the months of training have gone on, I now find that I need to remove the "clicks" and stiffness from my hands. Making a fist as tight as I can or closing the No.3 does the trick. We would advise people to do the minimum warm-up they can away with and still train at their peak.
Nathan Holle(네이썬 홀, CoC No.4 인증자)과 그의 형제들인 Craig 그리고 Gavin 중 어느 누구도 여태까지 준비 운동을 한 번도 해온 적이 없다. 우리가 준비 운동이 해롭다고 생각해서 그랬던 것은 아니다. 단지 우리만의 훈련을 곧바로 시작하기 때문이었다. 수개월 간의 트레이닝을 해오던 중, 나는 내 손에서 나는 관절 소리와 주먹의 뻣뻣함을 없애야겠다고 느꼈다. 주먹을 최대한 단단하게 쥐거나 No.3를 쥐는 것이 효과가 있었다. 그래서 우리는 사람들에게 준비 운동을 최소화하고, 그들이 할 수 있는 최대한의 운동을 곧바로 시작하기를 권해왔었다.
If a gripper is easily within the reach of someone, then virtually any regular training will eventually get them there. Our current gripper routine takes about an hour: we train grippers three times a week, Tuesday, Thursday and Saturday, and sometimes we will train on Sunday as well.
당신의 주변에 하나의 악력기라도 있다면, 사실상 어느 정규적인 훈련이라도 할 수 있다. 우리의 최근 훈련은 대략 한 시간 정도로 이루어져있다. 우리는 일주일에 악력기로 세 번 훈련을 한다. 화, 목, 토요일에 주로 훈련을 하고 가끔은 일요일에도 한다.
I know it sounds a bit silly to tell people how to chalk their hands, but if you do it correctly, it can greatly aid your training(although some hands can perform just as well without chalk). Our technique on the grippers requires only the palm to be chalked(so that the fingers can slide over the handle), in a band across the hand at every point where the handle will be in contact with skin. Rub a little chalk into the hand and them remove as much as possible with a cloth, re-chalk before your first attempt, and then whenever you need it.
사람들에게 손에 초크(Chalk, 탄마가루 혹은 분)를 바른다고 하면 조금 바보같이 들릴지도 모른다. 그러나 당신이 손에 제대로 초크를 바른다면, 그것은 훈련에 엄청난 도움이 될 것이다(물론 어떤 사람들은 손에 초크를 바르지 않고도 훈련을 잘 해낼 수 있긴 함). 우리는 악력기를 쥘 때, 손가락은 핸들을 미끄러지듯이 쥘 수 있도록 손바닥에만 분칠을 한다. 손에 조금의 분을 칠한 후 천으로 최대한 닦아내라. 그리고 처음 악력기를 쥐기 전에 한 번 더 칠하고, 그 후엔 필요할 때마다 칠해라.
When you p-osition the gripper in your hand, you are looking for a spot to anchor the handle securely, as far up toward the fingers as comfortable. If you make an open fist with your hand, you will see that the first bone of the fingers can only close to about a 90-degree angle to the hand. If the gripper handles are not closed when your fingers have reached this point, the gripper is never going to shut no matter how strong you get. In practice, the optimal p-osition unique to you for maximum power could be a few millimeters closer, so that fingers never make it to 90 degrees before the handles touch.
악력기를 손에 쥘 때, 당신은 손가락이 편하게끔 신경을 쓰면서 핸들을 안전하게 쥘 수 있는 지점을 찾아야 한다. 만약 주먹이 꽉 쥐어지지 않고 벌어져 있다면, 손가락의 첫 번째 마디가 90도까지도 접힐 수 있는 걸 보게 될 것이다. 만약 핸들에 손가락들을 밀착시키지 않고 악력기를 쥐려고 하면, 당신이 아무리 힘이 세더라도 절대로 악력기를 닫을 수 없을 것이다. 실제로, 당신이 최대의 힘을 발휘할 수 있는 최적의 위치는 몇 미리 미터 간격으로 악력기를 쥐는 것일 수 있는데, 그렇게 되면 손가락 마디가 90도로 꺾이는 일은 없을 것이다.
We place the gripper so that the bottom of the handle is on the first line in the palm just below the knuckles, and the top of the gripper handle is securely against the thumb pad. Also we place the gripper so that when we squeeze, we get all of our fingers as low down on the handle as possible for maximum leverage: only half of the little finger should be on the handle.
우리는 악력기를 쥘 때 핸들의 아랫부분은 손가락 관절 바로 아래에 있는 손바닥 라인(감정선)에 닿게 하고, 핸들의 맨 윗부분은 안전하게 썸패드(엄지손가락 아래의 도톰한 부분)에 밀착시킨다. 또한 악력기를 짜낼 때(꽉 쥘 때) 우리는 최대의 지렛대 효과를 위해서 모든 손가락을 핸들에서 조금 아래로 내려놓는다. 그리고 오직 새끼손가락의 절반 정도만 핸들 위에 올려놓는다.
All of us find that loads of little things can help anchor the gripper, such as extending the thumb to stiffen the thumb pad and making a slight kink in the wrist. You will notice people get a better squeeze if they hold the spring or steady the handle with the finger: this is because the gripper is anchored much better.
우리는 썸패드를 뻣뻣하게 하기 위해 엄지손가락을 쫙 피거나 손목을 살짝 구부리는 것과 같은 작은 하중이 악력기를 더욱 쉽게 잡을 수 있도록 돕는다는 걸 깨달았다. 또한 스프링을 잡거나 손가락으로 핸들을 고정시켜 안정된 상태로 악력기를 쥐면 더욱 강하게 악력기를 짜낼 수 있다.
When the gripper handle is in the best p-osition in the palm, the other handle may be out of reach of the fingers, so you have to pull it in with the other hand. To keep the whole gripper from moving back out of p-osition, press on the palm handle with the thumb of the other hand, so you are pulling the handle together with the spare hand using the thumb and index finger, and simultaneously squeezing with all but the little finger of the gripping hand. When you are "set" in the correct p-osition, remove the non-gripping hand and squeeze in one swift motion.
악력기 핸들의 한 쪽이 손바닥에서 최적의 위치에 있을 때, 나머지 핸들은 손가락의 거리에서 벗어나 있을 것이므로 남는 손을 사용해서 악력기를 쥐는 손 쪽으로 집어넣어야 할 것이다. 악력기가 적절한 위치를 벗어나는 것을 막기 위해서 우선 악력기를 쥐는 손의 손바닥 쪽에 붙어있는 핸들을 다른 손의 엄지손가락을 이용해서 밀어주어라. 그리고 바깥으로 나와있는 핸들은 새끼손가락을 제외한 다른 손가락들로 동시에 쥐어짜주어라. 그리고 당신이 정확한 위치에 맞게 악력기를 쥐었을 때, 악력기를 쥐지 않는 손은 이제 거두고 한 손으로 악력기를 쥐어짜면 된다.
When training, set the gripper very deep, that is, until the handles are about 5mm apart, and squeeze from there. When you can close the gripper easily from this range, move on by setting the gripper a little farther out. It seems to us that as long as you can get some movement in the attempts, then you are on the way. We try to condition ourselves to give the attempt everything within a few seconds-finding that it is pointless to prolong the squeeze-so that you have completely given each attempt 100%. We have found sigles, with a good few minutes rest between them, to be the way to go.
훈련을 할 때, 악력기의 핸들이 5mm 정도가 떨어질 정도까지로 깊게 쥐어라. 그리고 당신이 악력기 핸들을 이 정도 간격으로 쉽게 닿게 할 수 있다면, 악력기 핸들 간격을 처음보다 좀 더 멀게 세팅해서 쥐어보아라. 당신이 이렇게 악력기 핸들 간의 거리를 조절할 정도의 시도를 하게 된다면, 이제 그립 트레이닝에 제대로 입문했다고 볼 수 있다. 우리들은 짧은 시간 내에 악력기 핸들 간격을 짧게 부터 길게까지 모두 조정하며 훈련을 한다. 왜냐하면 우리들은 단순히 악력기를 오랫동안 쥐어짠 상태를 유지하는 것은 의미가 없다고 판단했기 때문이다. 그 대신 차라리 악력기 핸들 간격을 지속적으로 바꾸며 모든 시도를 해보아라. 이렇게 훈련을 하면서 도중에 몇 분씩 휴식을 취해주면 아주 좋을 효과를 얻을 수 있을 것이다.
We do 4 to 6 attempts. This is based on good days and bad days(a bad day could be anything-an injury, feeling tired, etc.). Let's say you're setting the gripper to 10mm but only moving it to 9mm for the first 4 attempts; then there is little point in doing any more. However, if you are getting a good movement(say, down to 3mm) on the gipper on the first 4 attempts, then go for 6 attempts. We try to limit. the amount of singles to what in necessary. We have found using high numbers of attempts to be pointless, and you make yourself more injury-prone.
우리는 한 번 훈련할 때 보통 4~6번의 시도를 한다. 이것은 컨디션이 좋은 날이든 나쁜 날(부상을 당했거나 피곤한 날 등등)이든 변함이 없다. 당신이 악력기를 10mm를 목표로 잡고 세팅했는데 당신이 첫 4번의 시도동안 9mm밖에 움직이지 못했다고 가정을 해보자. 그렇다면 더 이상의 훈련은 무의미하다. 그러나 만약 당신이 첫 4번의 시도동안 아주 좋은 움직임을 보여줬다면, (가령 3mm까지 악력기를 쥐는 것) 이럴 때엔 6번의 시도까지 훈련을 해라. 우리는 한 번의 훈련 동안 이렇게 횟수에 제한을 두고 훈련을 한다. 한 번에 너무 많이 훈련을 한다고 해서 좋은 게 아니다. 오히려 당신의 부상 위험이 더 커질 것이다.
If people can't see a form of adding resistance or progression, they seem to be lost. In our opinion, the best form of progression is to develop the discipline to give every single attempt your all. To give an example of how all this comes together:
사람들은 훈련을 하면서 즉각적인 진전이나 성과를 내보이지 못하면, 멘붕에 빠져하는 것 같다. 그러나 그저 당신이 훈련 한 번 한 번을 할 때마다 최선을 다하려 하는 것이 가장 큰 진전이라고 우리는 생각한다. 아래에 이어서 훈련에 대한 예시를 들어보겠다.
- - -
Chalk up (re-chalk whenever needed).
분 칠하기 (필요할 때마다 덧칠해라).
Do one close of a gripper to remove "clicks" from your hand(or if you prefer, do a warm-up).
손에서 뿌드득거리는 소리를 없애기 위해 악력기를 한 번 쥐어서 닫아라(혹은 준비운동을 해도 좋다).
Then using the gripper you are currently trying to close, set the gripper deep to about 5mm and squeeze; take 4-6 attempts.
그 후 현재 당신이 목표로 하는 악력기를 쥔 후 5mm 간격이 될 때까지 꽉 쥐어라. 4~6번 정도 훈련을 해라.
Then using a gripper you can close: set the gripper as far out as you can close it and squeeze; take 4-6 attempts.
그 후 또 다른 당신이 감당할 수 있는 악력기를 가지고 할 수 있는 만큼 간격이 좁아지도록 꽉 쥐어짜라. 4~6번 정도 훈련을 해라.
Do this for both hands. You should train the left and right hand straight after each other, so it is 1 attempt with the right hand and 1 attempt with the left and then rest, and so on.
양손 모두 훈련을 해라. 당신은 반드시 왼손과 오른손을 곧바로 번갈아가며 훈련을 해야 한다. 즉 오른손으로 한 세트 훈련을 하고 왼손으로 한 세트 훈련을 하고 한 번 쉬어라.
Once you can get all your attempts from 5mm, next time set the gripper farther out. In our experience, when moving to a harder gripper, you can find yourself in a p-osition where it can take weeks of training to go from setting the gripper to 5mm at the start of the progression, to achieving a full +25-mm close. This is just as vital and just as productive.
모든 시도동안 5mm 간격까지 악력기를 전부 쥘 수 있다면, 그 다음번엔 악력기 핸들의 간격을 좀 더 넓혀라. 우리의 경험으로 비추어볼 때, 당신이 이전보다 더 어려운 악력기로 바꾼 후 5mm 간격까지 악력기를 쥘 수 있게 되려면 몇 주간의 훈련이 필요하다. 이러한 과정은 훈련에 있어서 아주 중요하고 또한 효율적이다.
- - -
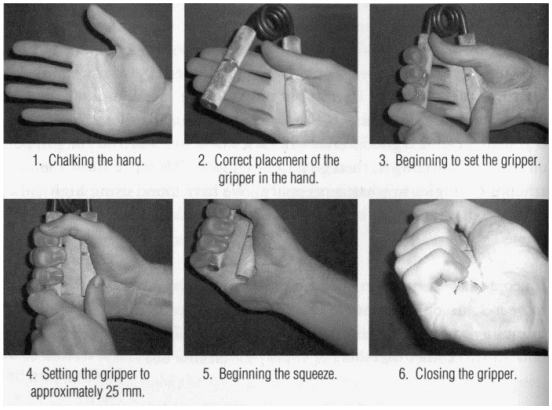
Nathan Holle shows the steps in training with partials on a Captains of Crush Gripper-in this case, with a No.4(!):
Nathan Holle은 Captains of Crush Gripper(CoC)의 훈련법을 참조해서 자신만의 훈련 단계들을 공개했다.(마지막 사진 참고)
1. Chalking the hand_손에 분칠하기
2. Correct placement of the gripper in the hand_손에서 악력기의 위치 조율하기
3. Beginning to set the gripper_악력기 세팅을 시작하기
4. Setting the gripper to approximately 25mm_악력기를 25mm 간격으로 세팅하기
5. Beginning the squeeze_쥐어짜기 시작
6. Closing the gripper_악력기를 완벽히 쥐어짠다(닫는다).
it is no going to be easy and it won't happen overnight. We all have trained very hard and have tried many methods. Between us we have a combined knowledge of 10-plus years, and we have found that using the above training method has been the most productive and beneficial.
운동이란 쉽지 않은 것이고 하룻밤 사이에 되는 일이 아니다. 우리들은 정말 고되게 훈련해왔고 수많은 방법들을 시도해왔다. 우리들은 10년 이상의 다양한 지식들을 가지고 있고, 위에 제시한 훈련 방법들이 가장 효율적이고 유익하다는 것을 발견했다.
Below is one of Craig's recent training sessions; both hands are trained, but only the right hand is shown:
아래는 Craig의 최근 훈련 기간 중 한 모습이다. 양손을 다 훈련했으니 오른 손만 보여지고 있다.
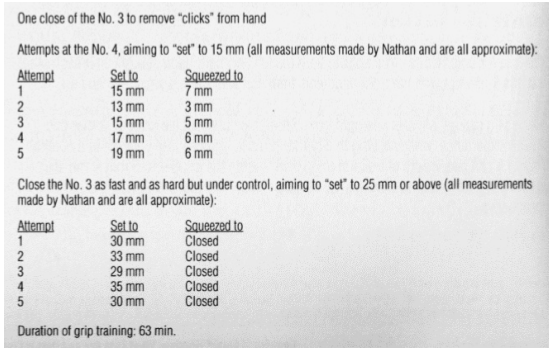
One close of the No.3 to remove "clicks" from hand.
No.3를 한 번 쥐어서 손을 풀어준다. (손에서 뿌드득거리는 소리를 없앰)
Attempts at the No.4, aiming to set to 15mm(all measurements made by Nathan and are all approximate):
15mm 간격을 목표로 No.4를 시도한다. (모든 수치는 Nathan Holle이 정한 것이고 전부 대략적인 것이다)
Attempt Set to Squeezed to_각 시도별로 쥐어짜야 하는 간격들
1 - 15mm 7mm
2 - 13mm 3mm
3 - 15mm 5mm
4 - 17mm 6mm
5 - 19mm 6mm
Close the No.3 as fast and as hard as possible but under control, aiming to set to 25mm or above(all measurements made by Nathan and are all approximate):
No.3를 통제할 수 있는 범위 내에서 최대한 빠르고 세게 닫아라. 25mm 간격에서 시작하거나 그보다 더 멀리부터 시작해라.(모든 수치는 Nathan Holle이 정했고 전부 대략적인 것)
Attempt Set to Squeezed to ~ 각 시도별로 쥐어짜야 하는 범위들
1 - 30mm closed
2 - 33mm closed
3 - 29mm closed
4 - 35mm closed
5 - 30mm closed
Duration of grip training: 63 minutes ~ 그립 트레이닝의 지속시간 : 63분
원문 : Captains of Crush Grippers What They Are and How to Close Them, Chapter 6
작성 : 본인 ( 혹시나 퍼가신다면 출처는 좀 남겨주시길 )
ps
뭐 별다른 내용은 없고, 악력기 누구나 알만한 악력기 사용방법인데 그 강도가 심히 좀 강하다 ... 뭐 이정도만 알고 계셔라 정도로 봐야겠습니다.
수정은 시간날때 하겠습니다. 지금은 너무 피곤 ;; 아 일하기 싫다 !
추천합니다...완벽합니다....스고이...